Get involved CodeIgniter development on GitHub
CodeIgniter's repository has moved from Bitbucket to GitHub.
So, I wrote this article to explain how to get involved CodeIgniter 2.x development on GitHub.
Prepare
First, go to https://github.com/ and create your account.
Then, install Git on you PC.
If you use Ubuntu, you can install it like below.
$ sudo apt-get install git-core
Fork EllisLab's CodeIgniter repository on GitHub
Fork EllisLab's CodeIgniter repository. It means to create your own CodeIgniter repository.
Go to
- EllisLab's CodeIgniter repository https://github.com/EllisLab/CodeIgniter
Now you've got your own CodeIgniter repository.

You can delete completely your repository at any time, so feel free to try it.
Clone your GitHub repository into your PC
Create a copy of your GitHub repository in your PC. In other words, download the GitHub repositoy to your PC.
$ git clone git@github.com:kenjis/CodeIgniter.git
It shows blew, and completed.
Cloning into CodeIgniter...
remote: Counting objects: 25091, done.
remote: Compressing objects: 100% (4826/4826), done.
remote: Total 25091 (delta 20435), reused 24892 (delta 20243)
Receiving objects: 100% (25091/25091), 28.05 MiB | 226 KiB/s, done.
Resolving deltas: 100% (20435/20435), done.
Register EllisLab's repository to your repository on your PC
Resister EllisLab's CodeIgniter repository as "upstream".
$ cd CodeIgniter/
$ git remote add upstream git://github.com/EllisLab/CodeIgniter.git
$ git fetch upstream
From git://github.com/EllisLab/CodeIgniter
 * [new branch]      develop    -> upstream/develop
 * [new branch]      feature/fixmemcache -> upstream/feature/fixmemcache
 * [new branch]      feature/html5 -> upstream/feature/html5
 * [new branch]      feature/ipv6 -> upstream/feature/ipv6
 * [new branch]      feature/unit-tests -> upstream/feature/unit-tests
 * [new branch]      feature/user-notes -> upstream/feature/user-notes
 * [new branch]      master     -> upstream/master
Configure Git
This is how to configure only the repository. If you want to configure your default configuration, you must edit "~/.gitconfig".
Move to the cloned repository's directory, and edit configuration file ".git/config".
$ vi .git/config
Add below, your name and email adddress.
[user]
	name = your_name
	email = foobar@example.jp
Change your code on your PC repositry
You must obey CodeIgniter Coding Standard. And, Taking part in CodeIgniter Development is also useful, but a bit old.
Don't forget to write User Guide which expresses your changes, and Change Log (changelog.html).
Create a branch for working
Before creating a branch for pull request, create a branch for working to send clean pull request.
In this article, a branch name for pull request is "html_escape", and a branch name for working is "html_escape_spike".
$ git branch html_escape_spike
$ git checkout html_escape_spike
Commit your change to your working branch
Git has "repository", "working directory", and "index" or "staging area".
The file flow: "working directory" -> "index" -> "repository"
"indexed" files will be registered to "repository".
To register your files to index, use "git add" command. Files when you run "git add" are registerd to index.
$ git add path/to/filename.php
You can confirm the file status by "git status" command.
$ git status
You can confirm the diff by "git diff" command.
$ git diff
To register your changes into the repository, first, use "git add" command to register to index (staging area). And use "git commit" command to register the indexed changes to your PC repository.
You can confirm files to be committed by "git status".
$ git add path/to/filename.php
$ git commit
Get changes of EllisLab's repository into your repository
EllisLab's repository is changing many times everyday. So during working time, it may changes. In this case, you can get the changes and update your repositroy. That makes Reactor engineers merge your pull request easily.
CodeIgniter's development is comming alone in "develop" branch. So move to develop branch, and pull EllisLab's develop branch.
$ git checkout develop
$ git pull upstream develop
And move to your working branch (html_escape_spike in this article), get the changes of develop branch into your working branch. You use "git rebase" command.
$ git checkout html_escape_spike
$ git rebase develop html_escape_spike
To use "rebase", you can move your changes after the EllisLab's repository changes.
If you've got any conflicts, edit the files manually and "git add file_name", "git rebase --contiune".
Create a branch for pull request
Create a branch for pull request. It is better that you create one branch per one pull request. If not, more than 2 changes, for example, 2 bug fixes, may be included in one pull request, and then your pull request never be merged by Reactor engineers.
Move to your working branch (html_escape_spike). And create a branch for pull request (html_escape), and move to the branch.
$ git checkout html_escape_spike
$ git checkout -b html_escape
Squash your multiple commits in html_escape branch into one commit. Use "git rebase -i"
$ git rebase -i develop
The above command can make squashing non-existent commits in develop branch into one. Your editor will be fired up, then replace "pick" for the second and subsequent commits with "squash".
Push your changes into your GitHub repository
Upload your changes in your PC repository to GitHub by "git push" command.
Push your branch for pull request (html_escape) to GitHub.
$ git push origin html_escape
Counting objects: 17, done.
Delta compression using up to 2 threads.
Compressing objects: 100% (9/9), done.
Writing objects: 100% (9/9), 1.12 KiB, done.
Total 9 (delta 8), reused 0 (delta 0)
To git@github.com:kenjis/CodeIgniter.git
 * [new branch]      html_escape -> html_escape
Completed.
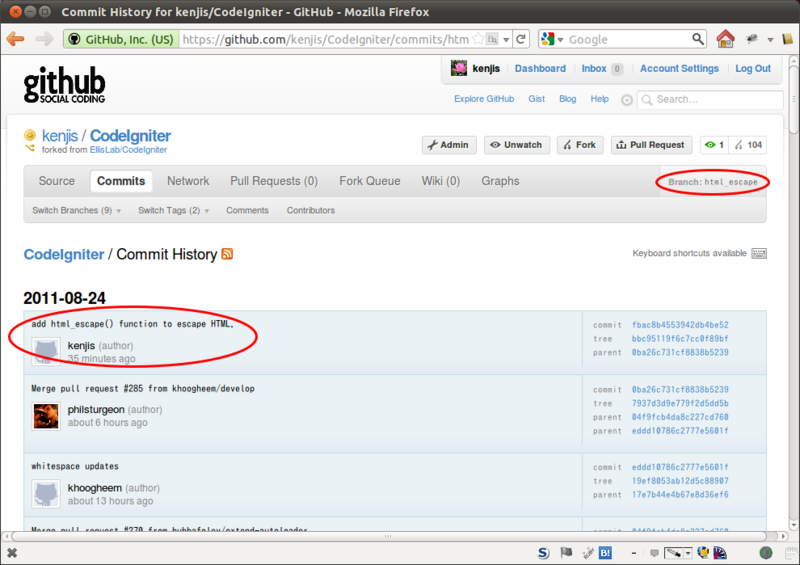
You can confirm it to go to your repository page on GitHub.

Send pull request to EllisLab
Go to your repository page on GitHub.

Confirm that the branch is right, then click "Pull Request" button.

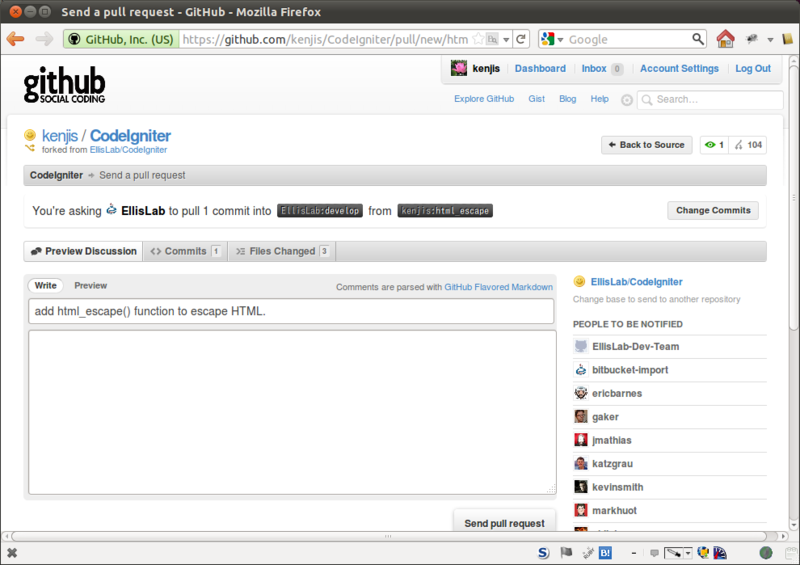
Write a explanation for the pull request, and confirm the pull request. You can confirm the diff from "Files Changed" tab. If it is OK, click "Send pull request" button.
Reference
- Fork a repo - GitHub Help
- 2011-05-28 (Japanese)
- git-rebase(1)

